When it comes to pinpointing HVAC system issues impacting the comfort and safety of your customers, there are basic steps you can take to test, diagnose, and repair the problem. These steps are known as airflow diagnostics.
By mastering airflow principles in your daily service practices, you can provide your customers the comfort that they want and deserve.
First, Test the System
Without mastering airflow testing, you cannot confidently recommend the right duct repairs. You also won’t know where to start or what to do to complete them successfully. Testing requires knowing what instruments to use and how to use them. So, step one is first to test static pressure, then airflow.

Testing begins with gathering information from both the indoor and outdoor equipment. Why? This data helps you establish static pressure and airflow targets before you measure. Here is the data you’ll need:
- Equipment type and location
- Indoor model number(s)
- Fan speed settings
- Maximum rated total external static pressure (TESP)
- Outdoor model number
- Outdoor unit tonnage.
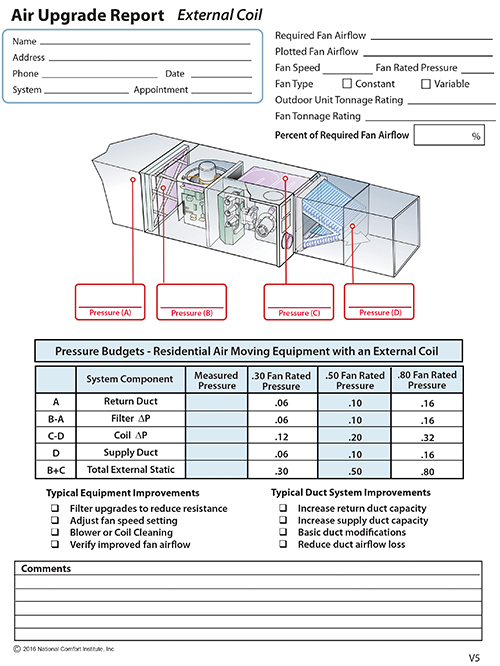
High-Performance HVAC system testing requires having the right instruments and knowing how to use them. You also need report forms to record your findings (Figure 1). Once you have this information in hand, you’re ready to test the system.
You can also use a free app called AirMaxx Lite (airmaxxlite.com) to help you start your static pressure and airflow diagnostics.
These items are the foundation for diagnosing system issues. Without them, well, you’re just guessing.
To measure static pressure, you will need a pressure testing kit that includes the following:
- Manometer – analog or digital
- Static pressure tips and tubing – neoprene or silicone
- 3/8-in. test port plugs
- Small drill/impact gun with a unibit and
- 3/8-in. drill bit with a sheath/stop
- Thin screwdriver – for cleaning out and removing internal duct insulation.
Click Below for the Next Page:


Recent Comments