

Delivered Room Airflow
Unless you measure airflow, you’re assuming an important piece of HVAC system performance. Many problematic rooms suffer from low airflow. So, to eliminate it as a potential suspect, the third air diagnostic test involves measuring airflow into and out of the problem room.
You’ll need a high-quality airflow hood to measure supply register and return grille airflow in the room. Some airflow hoods are designed for commercial and residential applications.
Make sure you choose one based on the type of work you do most and research options before investing. You can always contact NCI with questions and our recommendations.
One principle we teach in NCI’s Duct System Optimization course is how to estimate room airflow. Use the following simple test to quickly troubleshoot a single room to see if it has enough airflow.
To perform the test, measure supply airflow into the problem room with the airflow hood. Then compare your measurements to the room airflow estimate and see how close you are.
If supply and return airflow are within ± 10% of estimated airflow, then the ducts are in good shape. However, if airflow on either the supply or return is less than ± 10%, you’ll want to look for duct restrictions. Common duct restrictions include kinks, excess flex duct core, too many elbows, undersized ducting, and improper support.
Getting the proper amount of airflow in and out of a problematic room will correct many comfort issues you encounter. However, there are some tougher ones that require looking beyond airflow. This leads to our fourth air diagnostic test.
Duct System Temperature Loss
Temperature is another ingredient needed for comfort. When combined with airflow, you get Sensible Btus, or heat that you feel. Unfortunately, duct system temperature loss prevents comfort in many rooms. Don’t assume a duct system located inside the conditioned space is safe from this problem.
An easy way to check duct system temperature loss is to measure air temperatures from the supply register and return grille in the problematic room and compare them to the temperature change across the HVAC equipment.
Using four wireless temperature probes lets you see live equipment and system temperatures and reduces the time involved.
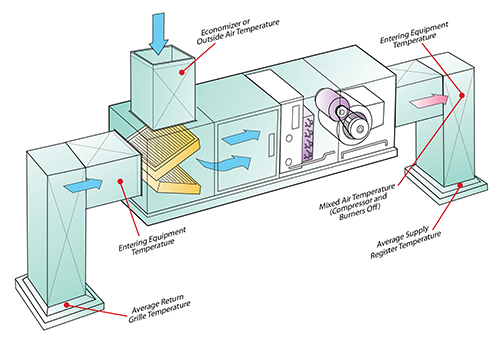
If a duct system has great insulation and minimal leakage, the equipment and room temperature change should be very close. There will be some differences, but duct system temperature loss to a room shouldn’t exceed more than a 10% of the equipment’s temperature change.
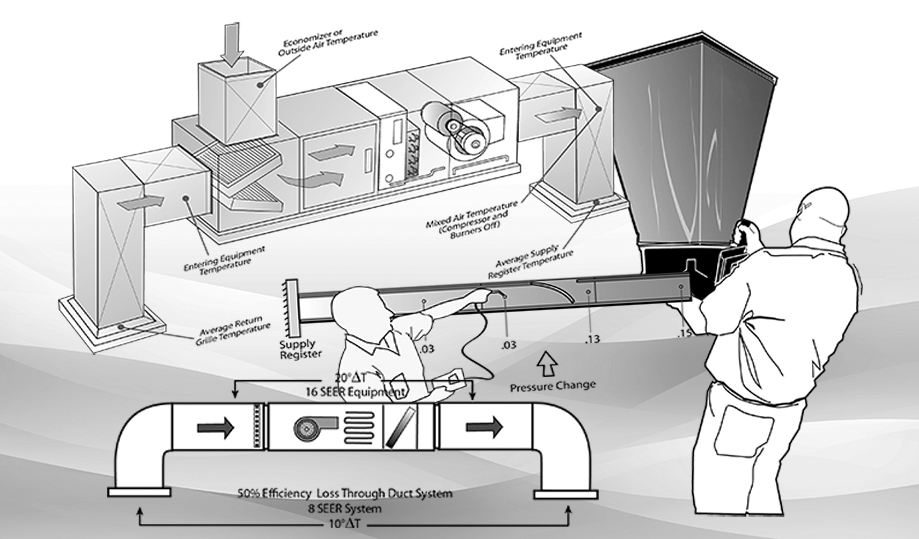
Let’s say you measure a heat pump operating in heating mode on a 30°F winter day. You measure temperatures at the air handler and find your supply air temperature is 88.9°F and return air temperature is 70.7°F. This equals an 18.2° temperature rise (88.9 – 70.7 = 18.2) across the air handler.
Next, you measure temperatures in the supply register and return grille in the problematic room. You find that the supply register temperature reading is 80.6°F and the return grille temperature is 71.5°F. This equals a 9.1° temperature rise (80.6 – 71.5 = 9.1) across the room.
To determine the percentage of duct temperature loss to the room, divide the 9.1° duct system temperature rise by the 18.2° air handler temperature rise (9.1 ÷ 18.2 = .5). After you move the decimal point two places to the right, you have a duct system temperature loss of 50%!
The most applicable repairs for duct temperature loss are adding duct insulation and duct sealing. Choose wisely from the various insulation options available. Some insulation types offer high promises but fail in extreme conditions. Repeating the temperature test can also help verify insulation effectiveness once repairs are complete.
Click Below for the Next Page:


Recent Comments